The Creation Engine No. 2
Babbage Linden In Real Life
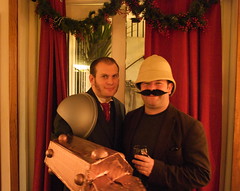
Sun 14 December 2008 by Jim Purbrick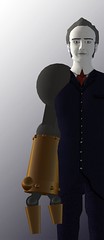 When I heard that the theme for the Linden Lab Christmas party was going to be steam punk, I knew I had to go as Babbage Linden. Since 2005 my avatar in Second Life has sported a victorian suit from Neverland and a steam arm, originally from a Steambot avatar which I updated to a more recent design from Marcos Fonzerelli after Joe Linden started washing his face in my sink.
I had a suit that was close enough and a bit of riffling through local shops and ebay got me a waistcoat and cravat that were a pretty good match, but I knew the arm was going to need a lot of construction, even if I went for the first version from the Steambot. After some Googling trying to find out how to construct a conical frustum I remembered the export to world project that had converted Second Life objects to paper craft models. So, after checking that Marcos didn’t mind me exporting his geometry from Second Life, I decided to do that.
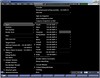 Installing OGLE proved to be really easy - just dragging the replacement OpenGL DLL and supplied config to the Second Life directory worked fine, but my first few captured scenes were full of unwanted clutter. In the end I found that using the advanced menu to turn off all render types apart from Basic, Volume and Bump and the UI feature allowed me to capture just the steambot arm placed in front of me in Second Life.
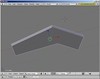 After opening the .obj file captured by OGLE in Blender, exporting it as a DXF and opening it in Pepakura Designer it was clear that the model was far too complicated - the cones and spheres created dozens of faces. Going back in to Second Life I broke the steambot arm in to 1 piece for each cardboard part I expected to make, stripped off all of the spheres, made the finger tips in to boxes instead of cones and then used the Second Life preferences to set the object mesh complexity to minimum, which reduced the number of faces on each cylinder to 6.
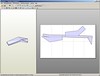 With these simplifications made the models looked much more managable when opened in Pepakura Designer, but it was still worth playing with open faces to simplify the parts in to quad strips. With these tweaks made I determined the correct scale. I placed my forearm on a couple of sheets of A4 and then adjusted the scale in Pepakura Designer until the steambot arm covered approximately the same amount of paper, then noted down the scale so I could use it when printing each part.
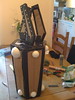 After printing the parts out on A4, I pinned them to some think double ply corrugated card from some old Dell boxes and then cut out the shapes and assembled them with gaffa tape, PVA and paper fasteners. I replaced the spheres with some polystyrene spheres from a craft shop and replaced the shiny with half a dozen coats of copperchrome spray paint.
I had a load of fun and the finished arm is amazingly sturdy, surviving 6 hours of Christmas party relatively unscathed. Who knows, maybe I’ll get another chance to wear it at an SLCC in the future. A full set of pictures with notes is available here.